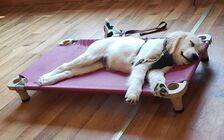
 Puppy Duke learning the place command.
 The place command is one of the first things I start to teach with many dogs. This command combines a send away, a stay, a stay within a barrier, impulse control and calming exercise all in one. Additionally, this can be the very start on walking on leash with a puppy or dog. Some dog owners and trainers may only utilize the stay portion, but I feel the send away portion is very valuable as time goes on. Let me explain a little bit about this very useful exercise.
In the beginning before proofing this exercise, you are working on at least three to four different skills. However, your dog can be totally green going into this exercise. In other words, there is nor prerequisite skill or command that they need to know, unless possibly feral and/or have just never been exposed to a leash or collar before (and are afraid of both). In that case, you may have to start getting them used to a collar or leash. Most puppies or dogs have been exposed to both before they begin a training regime.
What is a place command? I am going to describe the most common end result here:
- The ability to send your dog to a boundary area. These are things like a cot, dog bed, piece of furniture, mat, blanket that doesn't slide, rock, or table. These are just some of the things that you could end up using as your dog's place. Whatever you use at first, you want it to feel different than the floor it is on. For instance, carpet on carpet can be very confusing, because your dog will identify whether they are on or not by touch. There is also a negative place that could be used later. Like within the confines of a long line put in a circle or pvc pipe enclosed area.
- Once on the place, your dog understands they are to remain in the boundaries. Ideally you don't want any paws to come off the boundary area. This is the only rule of place. This is a command where you may want to keep your dog in for a half hour to an hour. You want your dog to get comfortable themselves. So they can stand and readjust while they are on the place as long as no paws come off it.
- During proofing of the training, you want your dog to understand to go up on or too anything with a boundary that you are pointing to. So you don't want your dog to only understand one place like their dog bed in the living room.
- The finished product generally ends with the dog off leash and able to be sent from a distance, and left there no matter what is going on around them. Obviously you need to train them, practice with them, and set them up for success for any environment you are planning to use this in.
STEP 1 OF STARTING THE PLACE COMMAND:
| Equipment needed: Place Object that Feels Different than the Floor, 6' Leash, Secure Collar, and (optional) treats which can be good for dogs that are not so sure about stepping onto something to lure them at first. STEP 1: Position your place equipment in the middle of the room. STEP 2: Start walking your dog around the room. STEP 3: Walk with your dog over the place area. When all four paws are in the place, say "place". STEP 4: Repeat step three from every angle of the place mat or bed (remember dogs can totally interpret something as "just from this direction", so help them to learn to generalize the command by doing this). STEP 5: After several (15 or so) repeats of this, stop short of the mat, and see if the dog is ready to step on themselves. | |
STEP 2 OF THE PLACE COMMAND STARTING THE SEND TO PLACE:
| STEP 1: You still have a leash and collar on your dog. The place (board, mat, dog bed) item is in the middle of the room so you can walk around it, and use all sides to place your dog (so that they do not generalize). STEP 2: Now as you approach the place, from a couple of steps away from the boarder of the "place item", extend your arm and point as you say "place" before the dog walks onto the place (different than before as you were saying place as you walked over with your dog, and only when the four paws were on the mat). STEP 3: If your dog does not make it onto the place themselves, use the collar lead and your body language (IE nudge into the direction) to help your dog to the place mat. Be sure once there, that all four of their paws are on it. If paws are sticking out beyond the boarder, just place your feet near them. If they try to walk off and you catch them early, you can normally just move towards them quickly, and they will walk back onto the place area. STEP 4: I do this until I can get three sets of four sends in a row that don't need prompting or correction. Once this has started, this usually takes 5-7 minutes. Later I use it as a warm up for Circle Place. | |
STEP 3 OF PLACE STARTING TO TEACH THE BOUNDARY BY CIRCLING THE PLACE:
| Add to above directions for send to place, but now you are concentrating on circle place. STEP 5: Once all four dog feet are on the place board, and your dog remains in whatever position he/she wants to, hold your six foot leash (this is so your dog can't dart away and have a game of chase), and circle close to the boarders of the place item (mat, board, dog bed). When a successful circle has been made, you can tell your dog "good place" and give them a scratch under the chin (or food reward) "yes" break and lead your dog off the place board. You can tell him/her that this was very good. You should only leave the place board once the performance has been good (IE you made circles around them very closely). Goal is to build this up to at least a minute. The biggest goal is to get four in a row of whatever time you have selected. So if your puppy keeps breaking, then you need to probably reduce the time. | |
STEP 4 OF THE PLACE COMMAND IS BEGINNING THE LONG PLACE:
| STEP 1: Walk to the place, point as you say "place" from the last distance practiced. STEP 2A: If your dog goes on the place, say "good boy" or "good [dog's name]" or "good place". NOTE: THAT "GOOD" HERE IS USED AS A VERBAL MARKER TO MEAN KEEP GOING OR GOOD JOB. IT DOES NOT MEAN THE DOG IS RELEASED FROM THEIR JOB. STEP 2B: If your dog does not walk on the place themselves, then you need to use the protocols in the send to directions. You can use the verbal marker "no" if you would like first. Then correct the dog via body bump or leash tug, until they are on the place (make sure you always practice the send as this gets going in a separate and much shorter session). NOTE: THAT THE VERBAL MARKER "NO" SIMPLY MEANS "THAT WAS NOT WHAT I WAS LOOKING FOR". USED CONSISTENTLY IT HELPS YOUR DOG PUT A PATTERN TOGETHER AND TRY SOMETHING DIFFERENT NEXT TIME. IT IS A WAY TO GET YOUR DOG TO USE THEIR MENTAL ENERGY. STEP 3: At first you will want to keep where you will sit close, and the leash in your hand to act quickly. Now you want to take a seat that you have placed at the appropriate distance from your dog. STEP 4A: At first, you will want to be ready to spring up should your dog try to leave when you sit or before you sit. This is pretty standard and normal to happen. You need to correct it as timely as your other training. Ways to start the correction are to walk into your dog, step on the leash, tug on the leash, body bump them if they are not all the way off, and the like. STEP 5: Keep this up for five minutes at first, until your dog can do this most times without breaking out of it (no matter the normal distractions that happen in your home or yard). You will want to build this up to 15 minutes and then a half an hour. Time in training: If you have the time, with the five minutes you can do four of them in one day. Once you get to 15 minutes, you could do one or two of them in a day. When I get to 30 minutes, I usually do one of them in a day, and keep a journal if they break or not. | |
NOTE: TO BRING THE BEGINNING WEEK 1 STEPS FORWARD, YOU START BUILDING MORE SPACE BETWEEN YOU AND THE PLACE/DOG WITH A LEASH AT FIRST. YOU START WITH THE 6' LEASH (AND YOU MIGHT DROP THIS LEASH IN THE INSIDE CIRCLE PLACES) AND MOVE ON TO THE 15' OR 20' LEASH UNTIL YOU CAN DROP THAT. EVENTUALLY, IF YOU HAVE DONE VERY CAREFUL WORK, YOU CAN TAKE THAT OFF AND HAVE A LEVEL OF RELIABILITY. THE TRICK IS NOT TOO GO FORWARD TOO FAST, AND TO BE VERY SURE THAT YOU CAN DO FOUR IN A ROW FOR 3 SETS OF THE SENDS FROM A DISTANCE (IF YOU CHOOSE TO USE THAT), AND FOUR IN A ROW OF MOVING OR CIRCLE PLACES. THEN FOR THE LONG PLACE HAVING A RELIABLE 30 MINUTE PLACE (SAFELY) IN MULTIPLE ENVIRONMENTS. MOST PEOPLE WILL NOT TRAIN AN OUT OF SIGHT PLACE, AND IT IS NOT NECESSARY. JUST KNOW THAT AN OUT OF SIGHT PLACE (MEANING THE HANDLER IS OUT OF SIGHT) IS A MORE ADVANCED TRAINING. ALSO, ALWAYS RETURN TO YOUR DOG IN A CIRCLE OR LONG PLACE TO RELEASE THEM.
The below is our very good boy, Leon, demonstrating his place skills around Alyssa, Tommy, Boris, and Spencer. Leon was very good at this command, and this is just us practicing and maintaining it. Notice that I send him from (what looks like) at least 10 feet to the place object (the lounge chair in this instance). An example of what a finished product might look like:
 RSS Feed